Saw blades have what is known as set, meaning that some teeth are bent slightly to the left and others to the right. It is important to try to equalize the numbers of right- and left-facing teeth in contact with the workpiece as if there is an imbalance, the saw blade is drawn toward the loaded teeth. The best way to do this is to ensure that the blade is at right angles to the surface of the workpiece with as many teeth as possible in contact.

Like the first picture above, rather than the second.
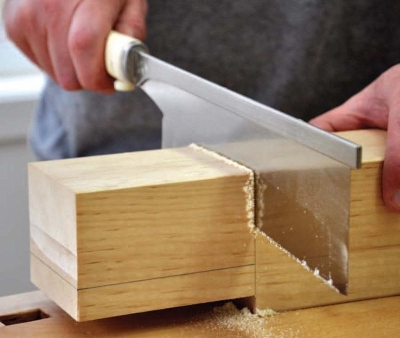
Z-saws are all traditional Japanese pull saws, which are ground to cut wood while pulling the saw blade towards the user. On the opposite stroke - pushing, the saw teeth on the kerf should be kept touching the base of the groove because on the push stroke, the saw teeth will shove saw dust away and clear the sawing groove. Pressure on the saw blade should be minimized to not more than blade weight on the push stroke.
Stroke the saw in a rhythm of 2-beats without stopping at the end of every stroke. Continual strokes are produced by a steady swing repeated close to your body. Try not to move the handle up and down (when sawing a horizontal workpiece) or from side to side: just towards your body to cut and then lightly away from the body. Using a Saw Guide can greatly assist in learning the proper sawing technique.
Excessive pressure on the saw blade may lead to a loss of straightness in the saw cut. The saw’s cutting
ability is affected by density differences in wood, as well as by knots and growth rings, etc. When you
encounter an uneven work piece, do not exert too much pressure on the saw blade and take your time over the
cut. This should result in a straight and smooth finish. If you get a clean and straight cut initially,
you save a lot of time finishing with files or chisels later.
The saw guide is good for maintaining stable strokes.
Cutting timber in a slant line, or vertically inclined, the saw blade receives thrusts from cutting. Start with slight pressure towards the cutting direction to leave enough time for the saw teeth to absorb the thrust.
If you hold the work piece with a vice or clamp, sawing is much easier and both hands are available for more stable saw strokes. If you have to hold the work piece by hand, 70% of your force should be apportioned for holding and only 30% for sawing. Laying a rubber sheet under the wood to be cut can considerably reduce the force required to keep the workpiece steady.
As you approach the end of the cut, the off-cut piece should be properly supported to avoid splitting and at the same time you should gradually reduce the force applied to the blade.
After you have finished sawing, use a brush to clean out saw dust stuck in the gullet (between the teeth), and oil the blade if it will not be used for some time. Wrapping with VCI (Vapour Corrosion Inhibitor) paper or newspaper can very effectively prevent blade corrosion.
When a saw blade becomes dull, and can’t meet its original standard, Z-saws cannot be re-sharpened since the hardness of the teeth is greater than the hardness of most conventional saw files. (Z-saw: HV 850 to 900, Conventional file: HV 700 to 800) Nevertheless, the saw can still be used in many less critical tasks, such as demolishing furniture, pruning trees, and rough cutting of wood and man-made boards when exactness and smoothness of cut are less important.
Copyright © Woodwork Projects