
On this page are the details of my most ambitious projects to date, both of which were undertaken while I was a student and able to use the college's comprehensive range of machinery. They are however possible with much more limited tools, so please don't let that put you off. If you do not try things you will never know what you can achieve, and all you stand to lose is the cost of your timber. (It could be argued that you will also lose the time you have expended if your effort does not work out, but I take the view that this is valuable experience and part of the never-ending learning cycle.)
I made these doors for my sister Sharon . The photograph was taken before the doors were fully finished. The challenge was to make a set of doors and frame to completely fill the space between two opposite walls, rather than buying ready-made doors, making a frame to fit them, then wondering how to utilise but close off the space above the doors.
This solution seems to work well although I may have used (for the doors) thicker timber than I needed to: I used thick timber to minimise the risk of warping but the result was very heavy doors!


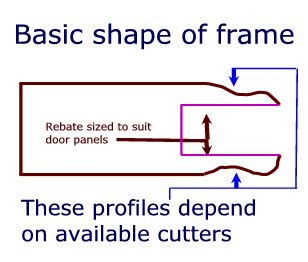
It is difficult to be too precise about the actual details of the door construction, as each situation will be different. To make the doors as I did, with scribed tenons, is impossible without access to a proper tenoning machine: they can however be made with straight mortice and tenon joints, the profile then being cut after assembly using a router with a suitable cutter. If you are seriously considering making doors of this type I recommend that you visit your local DIY superstore and have a look at their ready-made pine doors. This should give you an idea of relative sizes etc., and let you start planning your own doors. I would not recommend buying the timber from there however: you really need to use kiln-dried timber from a reliable source.
This table was originally designed as a way to use up a number of pieces of different hardwoods I had bought with no particular project in mind. This in turn necessitated the purchase of more timber for the legs, frame and table edge: in this case a wood called Goncalo Alves. When I had finished the construction I sanded the top [fortunately I was able to use a broad belt sander owned by a local firm] before giving the whole table several coats of Rustins Plastic Coating: very smelly and horrible stuff to work with but it does give a nice finish eventually.


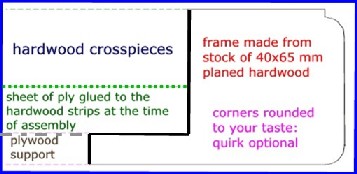
When I made this table I made the legs from 70x70mm planed timber, and the sub-frame from 100x25 mm planed timber. I would not recommend using timber much smaller than this unless you are making a very small table. I initially planed and thicknessed the hardwood crosspieces to 20 mm (but you could vary this), before grooving them along their lengths to enable a loose tongue to be inserted to join the pieces together. It is worth deciding on the order of the different pieces before you start assembly or you may end up with several similar timbers at one end. I then cut a sheet of ply to the size I wanted the table centre to be: that is the piece shown in green in the diagram above. I then prepared the loose tongues [using plywood, but biscuits would be just as good] before getting all the other components ready for assembly. NOTE: it is better not to cut the crosspieces to length until they have been glued to each other and the ply baseboard - they can be trimmed after the assembly is set. When assembling the components it is wise to ensure that the first crosspiece is absolutely square to the baseboard, and then to attach the remaining crosspieces and loose tongues as quickly as possible so that the cramps can be applied before the glue starts to set. Once the assembly is fully dry and set it can be trimmed to size using the ply baseboard as a guide. Thereafter all that remains to be done is to groove the sides of the assembly, and the table edges, and glue and cramp these on with loose tongues or biscuits.
The table frame is joined to the legs by mortice and tenon joints, and the second (thinner) sheet of ply can be added for extra strength. Depending on the weight of the finished product extra strength can be provided by inserting small section cross-members between the longer frame sides and/or by rubbing and glueing triangular softwood blocks where the frame sides join the legs.
Copyright © Woodwork Projects